


Apr 05, 2024
Homelab Domain Management
Recently in my home lab, I decided I finally wanted to make domains less awful. Previously, I’d generally run everything via HAProxy with a structure of <service>.<host>.olympus.lan which just about worked when I needed it to. However this came with some caveats:
- My DNS setup was awful
- This meant a lot of hard-coded domains in
/etc/hostsfiles to make things work when I couldn’t be bothered to debug DNS. It worked, but was painful to look at and extremely quick to fall out of date (potentially, everything is statically assigned so this isn’t much a of a problem, but you get the idea)
- This meant a lot of hard-coded domains in
.lanisn’t an actual TLD- This isn’t really a problem, but I got really mad typing in domains and then hitting enter and ending up on Google. Just a bad time
- No SSL
- Because they were all hosted on
.landomains, there was no chance of getting a valid SSL certificate for them - I could use a self-signed one, but I didn’t want to deal with cert warnings all the time, or the headaches that come with installing root certs on all my devices
- Because they were all hosted on
So all around, quite a bad time. However, I managed to limp by on this for a few years. In the last couple of months, I decided I had enough and decided to rebuild my local network domains and figured it would be fun to document.
It’s Always DNS
DNS is a marvel of the not-so-modern age. As a system, it’s impressive in its simplicity, and that level of simplicity has led to it sticking around and providing enough scope for it to be expanded through so many developments. There has been a tremendous amount of work to make DNS just work, and let it slip into the background so you don’t really have to think about it. Unfortunately, to make this work, I actually did have to think about it.
My requirements were basically:
- Be simple to configure
- Be simple to deploy
- Support wildcard domain resolution
And my soft requirement was ideally something that could run on two network interfaces, and return different results based on where the original request came from. This was because in my local network, I wanted to return actual local IPs (ie 10.x.x.x), and when outside my network, but attached to my Tailscale network, it would return a Tailscale IP (100.x.x.x). This wasn’t strictly necessary, in reality, I could just return a Tailcale IP at all times, however, I wanted this to be fairly resilient to failure in case nodes were logged out of Tailscale (on key rotation), or in the incredibly unlikely case that there was an outage (the Tailscale team seem incredibly on top of their shit).
I looked at options like bind9 and dnsmasq but honestly, they failed at the first point, figuring out how to configure them nicely. And in most cases, trying to get the multi-bind, different-reply thing working as expected was a headache at the best of times.
Here’s where things got a bit dumb: as a fun test I decided I wanted to try and write my own DNS server from scratch (ie on top of raw UDP packets). Why you may ask? Because I’m an idiot and I hate myself (remember this, it will come up a few times). This was a fun learning experience and I did actually manage to make some requests succeed which was exciting. However, I quickly realised that this would be horrific to actually make work in any kind of a good way, and it’s all well and good if breaks while running dig commands but as the core of my network, I wanted something fractionally more reliable.
So instead, I decided to use a stable, well-tested DNS server build a new one off the top of an existing library! This would handle the nitty-gritty details of the DNS packets, and let me handle the replies. The architecture was fairly simple
- If the domain is hard coded, return the value immediately
- If not, query to an upstream server and proxy the result through
And I wanted this to be simple to configure so I produced a fairly simple toml based format for configuring it.
1 | [global] |
There are some more config bits around where TTLs can exist, but it’s not really important. You didn’t really need to see the entire config structure, but I wanted to show how nice it is to use, and how easy it is to handle per-bind answers. For each of my local network nodes, I define one answer on the actual host (<host>.fake-domain.com), and one wildcard (*.<host>.fake-domain.com). And for each of these, they have two answers, one for the lan, and one for the tailscale (technically 4 because I do lan-udp, lan-tcp, tailscale-tcp and tailscale-udp).
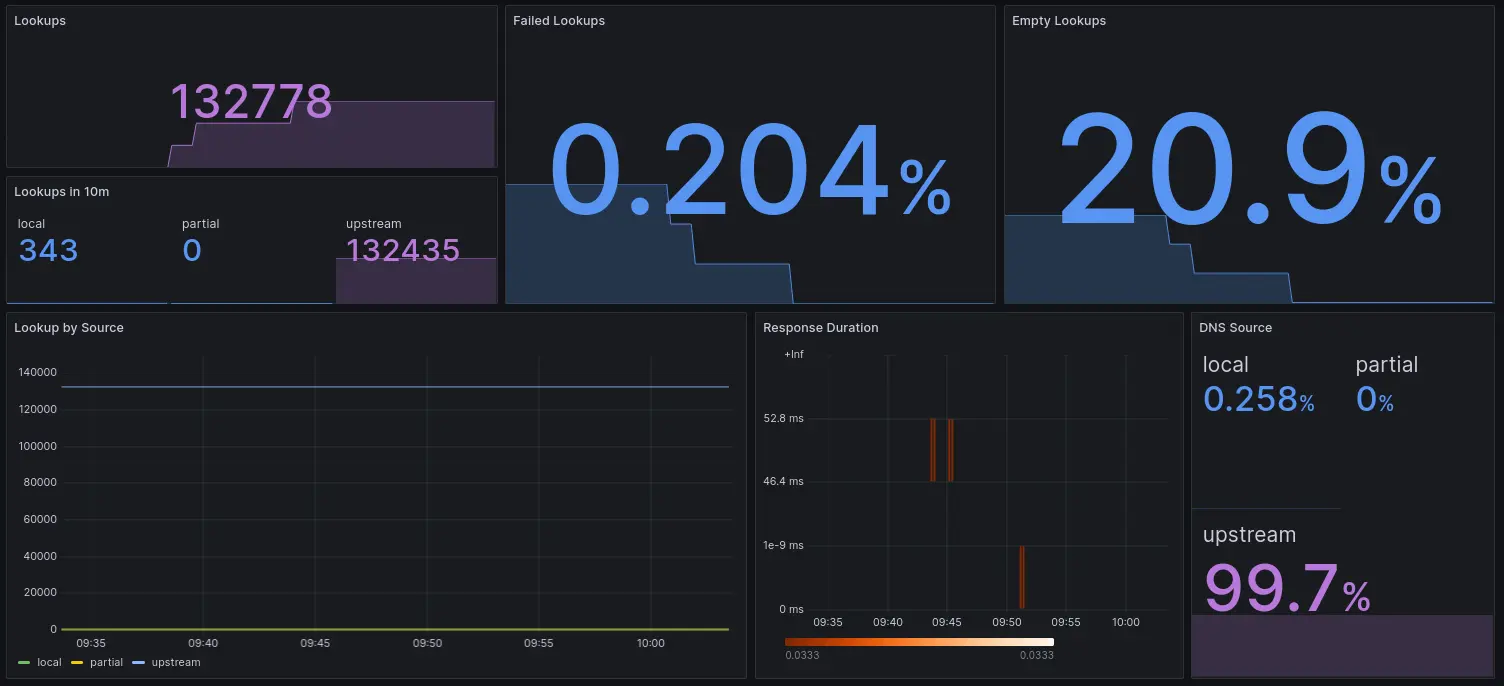
As a nice quality of life feature, this also supports pushing metrics to an external target (in this case my vmagent described in another post). This is a very basic set but covers how many requests are received, failed, answered locally, partially from each, and from the remote. This also lets me make some really pretty dashboards! Since deployment, it has answered over 130000 queries, 20% of them don’t return any records, and 99.8% of them go to the upstream servers. But that does mean it’s done over 300 local resolutions which I think is neat.

To finalise the setup, I set split-DNS on tailscale to use the node running this server for any requests on the lan domain, and massaged my ACL rules to actually let them access the DNS servers (this was actually a massive headache - it just didn’t look like it was working, turns out requests were getting forcibly closed because the ACL rules forbade it). Currently, this node has to be manually set as your DNS server, but I am planning on making it the network-wide default soon.
Now you may have some questions, why do this instead of an actually tested implementation? Will this scale? Aren’t you going to be more annoyed when it breaks and you can’t just google the errors? And to answer them in order: refer back to ‘I hate myself’; not in the slightest, but it doesn’t have to (and I could improve it with better data structures and concurrency); and almost certainly but again, see the previous reasons.
Please sir, can I have a TLD

Okay, now that I had a DNS server that roughly did what I wanted, I wanted to move away from .lan and into something that would actually be seen as a domain in browsers without having to prefix it with a protocol. This was really just a quality of life thing and not actually essential, but also meant I could maybe one day use SSL which would be a really nice upgrade, even if it wasn’t that much more secure (given the private keys are just sat randomly on the server, and easy as hell to access). This section really isn’t that interesting, I bought a cheap domain after a few months of deliberating.
Ugh, security
With an actual domain that I could have DNS records on, I could finally use LetsEncrypt to generate valid certificates for my local network. Thankfully DNS challenges are enough which means this domain didn’t actually need to point to anything. After registering with Cloudflare and generating API keys for zone management on it, I can just use certbot to generate SSL certificates as I need. for the time being, I just use a wildcard cert for everything.
This was a really nice quality-of-life improvement as I don’t need to deal with the insecure warnings in browsers, and some services will stop complaining as much about their cursed setups (ie HashiCorp Vault).
Provisioning Domains
The most recent aspect of this project was making a horrifically overcomplicated method to automate setting up my domains! Can you guess why (hint: I hate myself). For context, the majority of services I run on my homelab are in the form of docker containers which provide a really easy way to expose things in a way that has clear boundaries. Complicated systems are generally run via docker-compsoe (ie my metrics cluster) - the ironic exception being this domain management system (for the time being…)
This system was originally inspired by the simplicity of how things are set up at my work. While they don’t have a system like this for subdomains, they do for paths (or app roots), in which when you deploy, your service is automatically registered with any path changes, the load balancers all update and things just work without you having to think about them. I wanted the same general idea, where I don’t need to think about how the domains get set up, just define what I want and let it do the rest. What spawned from this was something a little bit larger and with the power to do much more.
Nothing better than a good caddy

In the past, each of my nodes has run its own reverse proxy. I originally started with HAProxy which I was actually a big fan of. It had its own unique downsides (ie there’s no in-built simple way to do a config reload without downtime technically), but it met all my requirements and had a pretty status page. Config updates were simple and easy to parse (I still use HAProxy for some public systems because of how simple it is).
When I experimented with k3s a while back, I ended up setting up nginx on one of my nodes. The goal was to have something with a very well-defined schema so I could programmatically generate configs and reload nginx. This would have been possible in haproxy as well but its config is less well defined with types (the manual is sprawling and hopes to write a nice parser and generator were quickly dashes). This was okay, I definitely had more affinity for haproxy but I made it work for a while. Being able to break off configs into separate files was a really nice feature to keep things organised.
However, there have been a lot of rumblings on the block about the new man in town: Caddy. They have some grand ambitions, to quote: “makes your sites more secure, more reliable, and more scalable than any other solution”. This is a noble goal, and they have definitely put in a lot of work to pull this off with some people drastically more talented than me. The main thing that drew me to it was the support for automatic SSL renewals, specifically that it can generate certificates on first access completely automatically, and handle renews for you. This was really cool and seemed perfect for what I wanted with automatic domain provisioning. Other features which made this the best choice included an admin API that allowed dynamically updating the config without downtime and some nice metric reporting.
I wanted a really simple interface on top of this specifically for managing domains. And as such caddy-idempotent-config was born. This project is a really simple web server that receives requests with a domain name, where it should point (ip+port), and a timestamp. If the timestamp is newer than the current entry (or an entry doesn’t exist) for that host, it replaces it. If the timestamp is older, the request is dropped. This means requests can be submitted, backfilled and resubmitted as needed and caddy will always have an up-to-date copy. This also merges with a base config which means I can still set up static routes and any other configuration I want.
The configs this generates for caddy include a host level matcher (i.e. all requests on the host specified get routed to the service) and one route based on the path to allow for use when there are issues with DNS (ie requests to /domain/<host>/... will be routed the same way as if you accessed <host>/...). This didn’t work out perfectly as I’ll get to later, but the host matching worked perfectly.
Okay, but how do we know what the domain is?

So now we have a nice system that can set up reverse proxies for domains on the fly with a really simple interface - how do we know what domains to provision and where are these calls coming from? As I mentioned before, I run the majority of my tooling inside docker containers, so ideally, I wanted something linked to docker to keep things centralised. My initial thought was to use labels to tag containers with the domains they should be accessible on. This would provide a really simple way to set up domains but comes with the downside that labels are currently immutable, meaning if I needed to change anything, wanted a new domain, wanted to remove an existing one, etc, I would have to recreate containers. This should be fine but would form a little bit of a nuisance.
Instead, I wanted something more ‘live’ where I could edit values on the fly. So I decided to make my own metadata server which would hold some properties about each container which I could then query. This would allow all the updates I could possibly want, but came with the downside that it kind of existed outside of the docker world and is another thing to maintain. If you’re wondering whether I could have just put up with labels: almost certainly, but refer back to the theme of this post for why I did it this way.
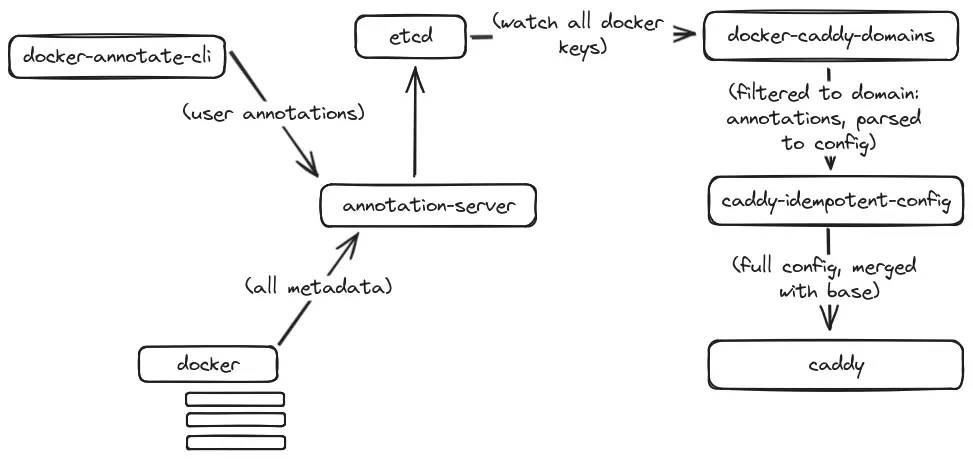
When setting something like this up, you must go overkill, those are just the rules. So this system is backed by etcd as the key-value store. An agent runs on each node and will store metadata about each running container, as well as any annotations. When a container is removed, the agent will automatically delete all metadata and annotations. This was surprisingly simple to set up thanks to docker events I could just watch for changes, and then write them to the KV store.
For handling the actual annotations, I created a command line tool which took a container name or ID, a key and a value and would write it straight to the store. This was then packaged into a docker-cli plugin (thanks to this wonderful tutorial) which meant I could simply run docker annotate <container> [<key> [<value>]].
So now I had a nice KV store of all the annotations for each container. There was one last glue piece to write: I needed a tool that would watch for updates in the KV store, and if they matched a specific pattern, push them to caddy-idempotent-config which would then push it to caddy for provisioning. This was really small and easy to write, it just listened to the prefix under which all keys were being written, and compared each based on regex. If it matched, it pushed it to the config server. This tool watched both labels and annotations which means I can include these in docker-compose files or from the command line and skip the annotation step.
Example
1 | # (this assumes the other components are running) |
And just like that, caddy will setup a reverse proxy route. And if I want I can go see the keys in etcd directly, along with the other metadata that is held about the container.
1 | $ etcdctl get --prefix --keys-only docker |
Each system also writes their hostname in the key which is used to resolve the IP address for the reverse proxy.
So was it worth it?
Kinda. This was a stupid amount of effort to avoid writing 3 new lines in a HAProxy config, but should in theory make my life easier. I have plans to extend this system out a little more, so I can use etcd as a source of truth for some domains (ie put manual ones under domains/<host>/<domain> = <port>), or use the metadata in the etcd for fun visualisations and monitoring. But in summary, this means I have custom domains, with SSL certificates for my home network, with network-aware DNS resolution with new domains provisioned automatically from docker containers on launch. Which I think is neat